

Deploy Llama 3 on GPU with MAX


This tutorial shows you how to serve Llama 3 with an OpenAI-compatible endpoint, from local testing to production deployment on major cloud platforms. You'll learn to automate the deployment process using Infrastructure-as-Code (Iac) and optimize performance with GPU resources.
MAX provides a streamlined way to deploy large language models (LLMs) with production-ready features like GPU acceleration, automatic scaling, and monitoring capabilities. Whether you're building a prototype or preparing for production deployment, this tutorial will help you set up a robust serving infrastructure for Llama 3.
And although we're using Llama 3 in these instructions, you can swap it for one of the hundreds of other LLMs from Hugging Face by browsing our model repository.
The tutorial is organized into the following sections:
- Local setup: Run Llama 3 locally to verify its basic functionality.
- Cloud deployment: Deploy Llama 3 to AWS, GCP, or Azure using IaC templates and CLI commands.
System requirements:
Mac
Linux
WSL
GPU
Local setup
In this section, you will set up and run Llama 3 locally to understand its capabilities and validate functionality before moving to the cloud. This part doesn't require a GPU because MAX can also run Llama 3 on CPUs, but we recommend using a compatible GPU for the best performance.
1. Set up your environment
Create a Python project to install our APIs and CLI tools:
- pixi
- uv
- pip
- conda
- If you don't have it, install
pixi:curl -fsSL https://pixi.sh/install.sh | shThen restart your terminal for the changes to take effect.
- Create a project:
pixi init llama3-tutorial \ -c https://conda.modular.com/max-nightly/ -c conda-forge \ && cd llama3-tutorial - Install the
modularconda package:- Nightly
- Stable
pixi add modularpixi add "modular==25.6" - Start the virtual environment:
pixi shell
- If you don't have it, install
uv:curl -LsSf https://astral.sh/uv/install.sh | shThen restart your terminal to make
uvaccessible. - Create a project:
uv init llama3-tutorial && cd llama3-tutorial - Create and start a virtual environment:
uv venv && source .venv/bin/activate - Install the
modularPython package:- Nightly
- Stable
uv pip install modular \
  --index-url https://dl.modular.com/public/nightly/python/simple/ \
  --prerelease allow
uv pip install modular \ --extra-index-url https://modular.gateway.scarf.sh/simple/
- Create a project folder:
mkdir llama3-tutorial && cd llama3-tutorial - Create and activate a virtual environment:
python3 -m venv .venv/llama3-tutorial \ && source .venv/llama3-tutorial/bin/activate - Install the
modularPython package:- Nightly
- Stable
pip install --pre modular \
  --index-url https://dl.modular.com/public/nightly/python/simple/
pip install modular \ --extra-index-url https://modular.gateway.scarf.sh/simple/
- If you don't have it, install conda. A common choice is with
brew:brew install miniconda - Initialize
condafor shell interaction:conda initIf you're on a Mac, instead use:
conda init zshThen restart your terminal for the changes to take effect.
- Create a project:
conda create -n llama3-tutorial - Start the virtual environment:
conda activate llama3-tutorial - Install the
modularconda package:- Nightly
- Stable
conda install -c conda-forge -c https://conda.modular.com/max-nightly/ modularconda install -c conda-forge -c https://conda.modular.com/max/ modular
2. Serve Llama 3 locally
Next, use the max CLI tool to start an endpoint with the Llama 3 model
locally, and ensure that the model runs as expected before deploying it in the
cloud.
-
Generate a response to a prompt with the following command:
max generate --model modularai/Llama-3.1-8B-Instruct-GGUF \ --prompt "What is the meaning of life?" \ --max-length 250 -
Start the model server using
max serve:max serve --model modularai/Llama-3.1-8B-Instruct-GGUFThis starts a local endpoint with an OpenAI-compatible endpoint. Next, we'll send it an inference request.
3. Test the local endpoint
The endpoint is ready when you see this message in the terminal:
Server ready on http://0.0.0.0:8000 (Press CTRL+C to quit)Then, you can test its functionality by sending a curl request from a new
terminal:
curl -N http://0.0.0.0:8000/v1/chat/completions \
    -H "Content-Type: application/json" \
    -d '{
        "model": "modularai/Llama-3.1-8B-Instruct-GGUF",
        "messages": [
            {"role": "system", "content": "You are a helpful assistant."},
            {"role": "user", "content": "Who won the World Series in 2020?"}
        ]
    }' | jq -r '.choices[].message.content'
You should see output like this:
The Los Angeles Dodgers won the 2020 World Series. They defeated the Tampa Bay Rays in the series 4 games to 2. This was the Dodgers' first World Series title since 1988.To learn more about the supported REST body parameters, see our API reference for chat completion.
Now that the model works locally, we'll transition to cloud deployment.
Cloud deployment paths
We will use Infrastructure-as-Code (IaC) to create, configure, and deploy Llama 3 in the cloud. The cloud deployment instructions are divided by provider: AWS, GCP, and Azure.
Cloud deployment overview
For AWS, we will use CloudFormation, for GCP, we will use Deployment Manager, and for Azure, we will use Resource Manager. These IaC templates handle resource provisioning, networking, and security configuration. This approach simplifies deployments and ensures they are repeatable.
The key steps are:
- Create and Deploy Stack/Resources: Use IaC templates for each cloud provider to deploy Llama 3.
- Test the Endpoint: Retrieve the public IP address after deployment and send a request to test the Llama 3 endpoint in the cloud.
Each cloud-specific tab provides complete commands for setup, configuration, deployment, and testing.
To better understand the flow of the deployment, here is a high-level overview of the architecture:
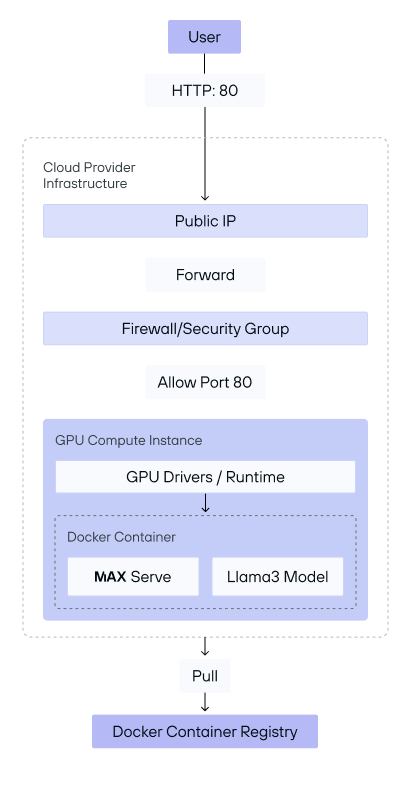

This architecture diagram illustrates the two-phase deployment setup for serving the Llama 3 model with MAX on cloud provider infrastructure.
The deployment process is divided into two phases:
- Phase 1: Cloud stack creation: In this initial phase, the following
infrastructure is provisioned and configured to prepare for serving requests:
- Public IP assignment: The cloud provider assigns a public IP to the virtual machine (VM), allowing it to be accessed externally.
- Firewall/Security group configuration: Security settings, such as firewall rules or security groups, are applied to allow traffic on port 80. This setup ensures that only HTTP requests can access the instance securely.
- GPU compute instance setup: A GPU-enabled VM is created to handle model
inference efficiently. This instance includes:
- GPU drivers/runtime installation: Necessary GPU drivers and runtime libraries are installed to enable hardware acceleration for model processing.
- Docker container initialization: A Docker container is launched on the VM, where it pulls the necessary images from the Docker Container Registry. This registry serves as a central repository for storing Docker images, making it easy to deploy and update the application.
Inside the container, MAX is set up alongside the Llama 3 model. This setup prepares the environment for serving requests but does not yet expose the endpoint to users.
- Phase 2: Serving the user endpoint: Once the cloud stack is configured and
the VM is set up, the deployment enters the second phase, where it starts
serving user requests:
- HTTP endpoint exposure: With the VM and Docker container ready, the system opens an OpenAI compatible HTTP endpoint on port 80, allowing users to interact with the deployed Llama 3 model.
- Request handling by MAX: When a user sends an HTTP request to the public IP, MAX processes the incoming request within the Docker container and forwards it to the Llama 3 model for inference. The model generates a response, which is then returned to the user via the endpoint.
Prerequisites
Be sure that you have the following prerequisites, as well as appropriate access and permissions for the cloud provider of your choice.
-
GPU resources: You'll need access to GPU resources in your cloud account with the following specifications:
- Minimum GPU memory: 24GB
- Supported GPU types: See our compatible GPUs
This tutorial has been tested on the following NVIDIA instances:
g5.4xlarge(A10G) on AWS,g2-standard-8(L4) on GCP, andStandard_NV36ads_A10_v5(A10G) on Azure. It has also been tested on the AMDStandard_ND96isr_MI300X_v5(MI300X) Azure instance. You can alter the provided cloud config files to deploy MAX on any compatible cloud instance or virtual machine. -
A Hugging Face user access token: A valid Hugging Face token is required to access the model. To create a Hugging Face user access token, see Access Tokens. You must make your token available in your environment with the following command:
export HF_TOKEN="hf_..." -
Docker installation: Install the Docker Engine and CLI. We use a pre-configured GPU-enabled Docker container from our public repository. For more information, check out all of our available containers.
-
Cloud CLI tools: Before deploying, ensure that you have the respective cloud provider CLI tools installed.
- AWS CLI v2 installed and configured with appropriate credentials
- Google Cloud SDK installed and initialized
- Azure CLI installed, logged in, and configured
- AWS
- GCP
- Azure
Configure the AWS CLI:
aws configureLog in to your AWS account:
aws sso loginCheck the credentials via cat ~/.aws/credentials to make sure it is set up
correctly. You can also include the credentials as environment variables:
export AWS_ACCESS_KEY_ID="YOUR_ACCESS_KEY_ID"
export AWS_SECRET_ACCESS_KEY="YOUR_SECRET_ACCESS_KEY"
Initialize the Google Cloud SDK:
gcloud initLog in to your Google Cloud account:
gcloud auth loginInitialize the Azure CLI:
az initLog into your Azure account:
az login1. Create stack/deployment
In this section, we'll walk through creating a deployment stack on AWS, GCP, and Azure. Each cloud provider has its own configuration steps, detailed below, but we simplify the setup by using Infrastructure-as-Code (IaC) templates.
Start by cloning the MAX repository and navigating to the
modular/examples/cloud-configs/ directory, where the necessary IaC
templates and configuration files are organized for each cloud provider.
git clone -b stable https://github.com/modular/modular && cd modular/examples/cloud-configsThis directory includes all files required to deploy MAX to AWS, GCP, or Azure:
max/examples/cloud-configs/
├── aws
│   ├── max-nvidia-aws.yaml
│   └── notify.sh
├── azure
│   ├── amd
│   │   ├── max-amd-azure.json
│   │   └── notify.sh
│   ├── nvidia
│   │   ├── max-nvidia-azure.json
│   │   └── notify.sh
└── gcp
    ├── max-nvidia-gcp.jinja
    └── notify.sh
With these IaC templates ready, choose your preferred cloud provider and follow the step-by-step instructions specific to each platform.
- AWS
- GCP
- Azure (Nvidia)
- Azure (AMD)
First navigate to the AWS directory:
cd awsSet the region in your environment:
export REGION="REGION" # example: `us-east-1`Then, create the stack. You can explore the max-nvidia-aws.yaml file for AWS
CloudFormation configuration information.
export STACK_NAME="max-serve-stack"

aws cloudformation create-stack --stack-name ${STACK_NAME} \
 --template-body file://max-nvidia-aws.yaml \
 --parameters \
   ParameterKey=InstanceType,ParameterValue=g5.4xlarge \
   ParameterKey=HuggingFaceHubToken,ParameterValue=${HF_TOKEN} \
   ParameterKey=HuggingFaceRepoId,ParameterValue=modularai/Llama-3.1-8B-Instruct-GGUF \
 --capabilities CAPABILITY_IAM \
--region $REGIONFirst, navigate to the GCP directory:
cd gcpSet the project ID:
PROJECT_ID="YOUR PROJECT ID"
export ZONE="ZONE" # example `us-east1-d`
Enable the required APIs:
gcloud services enable deploymentmanager.googleapis.com --project=${PROJECT_ID} && \
gcloud services enable logging.googleapis.com --project=${PROJECT_ID} && \
gcloud services enable compute.googleapis.com --project=${PROJECT_ID}
Create the deployment with the following command. You can explore the
max-nvidia-gcp.jinja file for more information on the Deployment Manager
configuration.
export DEPLOYMENT_NAME="max-serve-deployment"
export INSTANCE_NAME="max-serve-instance"

gcloud deployment-manager deployments create ${DEPLOYMENT_NAME} \
  --template max-nvidia-gcp.jinja \
  --properties "\
instanceName:${INSTANCE_NAME},\
zone:${ZONE},\
machineType:g2-standard-8,\
acceleratorType:nvidia-l4,\
acceleratorCount:1,\
sourceImage:common-cu123-v20240922-ubuntu-2204-py310,\
huggingFaceHubToken:${HF_TOKEN},\
huggingFaceRepoId:modularai/Llama-3.1-8B-Instruct-GGUF" \
  --project ${PROJECT_ID}
First, navigate to the Azure directory:
cd azure/nvidiaSet the region:
export REGION="REGION" # example `westus3`Then, create the resource group:
export RESOURCE_GROUP_NAME="maxServeResourceGroup"
export DEPLOYMENT_NAME="maxServeDeployment"
az group create --name ${RESOURCE_GROUP_NAME} --location ${REGION}
Check the status of the resource group:
az group show -n ${RESOURCE_GROUP_NAME} --query properties.provisioningState -o tsvCreate and encode the startup script:
STARTUP_SCRIPT='#!/bin/bash

sudo usermod -aG docker $USER

sudo systemctl restart docker

sleep 10

HF_TOKEN=$1
HUGGING_FACE_REPO_ID=${2:-modularai/Llama-3.1-8B-Instruct-GGUF}

sudo docker run -d \
  --restart unless-stopped \
  --env "HF_TOKEN=${HF_TOKEN}" \
  --env "HF_HUB_ENABLE_HF_TRANSFER=1" \
  -v ~/.cache/huggingface:/root/.cache/huggingface \
  -v ~/.cache/max_cache:/opt/venv/share/max/.max_cache \
  --gpus 1 \
  -p 80:8000 \
  --ipc=host \
  modular/max-nvidia-full:latest \
  --model-path ${HUGGING_FACE_REPO_ID}'

export STARTUP_SCRIPT=$(echo "$STARTUP_SCRIPT" | base64)
Then, create the deployment:
export VM_PASSWORD="YOUR-SECURE-PASSWORD-123"

az deployment group create \
    --name ${DEPLOYMENT_NAME} \
    --resource-group ${RESOURCE_GROUP_NAME} \
    --template-file max-nvidia-azure.json \
    --parameters \
        adminUsername="azureuser" \
        adminPassword=${VM_PASSWORD} \
        vmSize="Standard_NV36ads_A10_v5" \
        osDiskSizeGB=128 \
        vnetAddressPrefix="10.0.0.0/16" \
        subnetAddressPrefix="10.0.0.0/24" \
        startupScript="${STARTUP_SCRIPT}" \
        location="${REGION}"
First, navigate to the Azure directory:
cd azure/amdSet the region:
export REGION="REGION" # example `westus3`Then, create the resource group:
export RESOURCE_GROUP_NAME="maxServeResourceGroup"
export DEPLOYMENT_NAME="maxServeDeployment"
az group create --name ${RESOURCE_GROUP_NAME} --location ${REGION}
Check the status of the resource group:
az group show -n ${RESOURCE_GROUP_NAME} --query properties.provisioningState -o tsvCreate and encode the startup script:
STARTUP_SCRIPT='#!/bin/bash

sudo usermod -aG docker $USER

sudo systemctl restart docker

sleep 10

HF_TOKEN=$1
HUGGING_FACE_REPO_ID=${2:-modularai/Llama-3.1-8B-Instruct-GGUF}

sudo docker run -d \
  --restart unless-stopped \
  --env "HF_TOKEN=${HF_TOKEN}" \
  --env "HF_HUB_ENABLE_HF_TRANSFER=1" \
  -v ~/.cache/huggingface:/root/.cache/huggingface \
  -v ~/.cache/max_cache:/opt/venv/share/max/.max_cache \
  -p 80:8000 \
  --ipc=host \
  --device /dev/kfd \
  --device /dev/dri \
  modular/max-amd:latest \
  --model-path ${HUGGING_FACE_REPO_ID}'

export STARTUP_SCRIPT=$(echo "$STARTUP_SCRIPT" | base64)
Then, create the deployment:
export VM_PASSWORD="YOUR-SECURE-PASSWORD-123"

az deployment group create \
    --name ${DEPLOYMENT_NAME} \
    --resource-group ${RESOURCE_GROUP_NAME} \
    --template-file max-amd-azure.json \
    --parameters \
        adminUsername="azureuser" \
        adminPassword=${VM_PASSWORD} \
        vmSize="Standard_ND96isr_MI300X_v5" \
        osDiskSizeGB=256 \
        vnetAddressPrefix="10.0.0.0/16" \
        subnetAddressPrefix="10.0.0.0/24" \
        startupScript="${STARTUP_SCRIPT}" \
        location="${REGION}"
2. Wait for resources to be ready
In this step, we'll wait for the resources to be ready. Stack and deployment creation may take some time to complete.
- AWS
- GCP
- Azure
aws cloudformation wait stack-create-complete \
--stack-name ${STACK_NAME} \
--region ${REGION}
gcloud deployment-manager deployments describe ${DEPLOYMENT_NAME} \
--project=${PROJECT_ID}Wait for the deployment to be completed and report its status:
az deployment group wait \
--name ${DEPLOYMENT_NAME} \
--resource-group ${RESOURCE_GROUP_NAME} \
--created
3. Retrieve instance information
After the resources are deployed, you'll need to get the instance information, such as the public DNS or IP address that we will use to test the endpoint.
- AWS
- GCP
- Azure
INSTANCE_ID=$(aws cloudformation describe-stacks --stack-name ${STACK_NAME} \
  --query "Stacks[0].Outputs[?OutputKey=='InstanceId'].OutputValue" \
  --output text \
  --region ${REGION})
PUBLIC_IP=$(aws ec2 describe-instances --instance-ids ${INSTANCE_ID} \
  --query 'Reservations[0].Instances[0].PublicIpAddress' \
  --output text \
  --region ${REGION})
echo "Instance ID: ${INSTANCE_ID}"
echo "Public IP: ${PUBLIC_IP}"
aws ec2 wait instance-running --instance-ids ${INSTANCE_ID} --region ${REGION}
First, check if the firewall rule already exists:
EXISTING_RULE=$(gcloud compute firewall-rules list \
  --filter="name=allow-http" \
  --format="value(name)" \
  --project=${PROJECT_ID})

if [ -z "$EXISTING_RULE" ]; then
  echo "Creating firewall rule..."
  gcloud compute firewall-rules create allow-http \
    --allow tcp:80 \
    --source-ranges 0.0.0.0/0 \
    --target-tags http-server \
    --description "Allow HTTP traffic on port 80" \
    --project=${PROJECT_ID}
else
  echo "Firewall rule 'allow-http' already exists"
fi
Check if the instance exists and tag it with http-server:
INSTANCE_EXISTS=$(gcloud compute instances list \
  --filter="name=${INSTANCE_NAME}" \
  --format="value(name)" \
  --project=${PROJECT_ID})

if [ -n "$INSTANCE_EXISTS" ]; then
  echo "Adding tags to instance ${INSTANCE_NAME}"
  gcloud compute instances add-tags "${INSTANCE_NAME}" \
    --project=${PROJECT_ID} \
    --zone "${ZONE}" \
    --tags http-server
else
  echo "Error: Instance ${INSTANCE_NAME} not found"
  exit 1
fi
Then, get the public IP:
PUBLIC_IP=$(gcloud compute instances describe "${INSTANCE_NAME}" \
  --zone "${ZONE}" \
  --format="get(networkInterfaces[0].accessConfigs[0].natIP)" \
  --project=${PROJECT_ID})
echo "Public IP: $PUBLIC_IP"
PUBLIC_IP=$(az network public-ip show \
--resource-group ${RESOURCE_GROUP_NAME} \
--name maxServePublicIP \
--query ipAddress -o tsv)
echo "Public IP: ${PUBLIC_IP}"4. Test the endpoint
-
Wait until the server is ready to test the endpoint
It will take some time for the stack or deployment to pull the MAX Docker image and set it up for serving. We need to wait for the Docker logs to appear and then make sure that the Docker container is running on port
8000.The server is ready when you see the following log:
Server ready on http://0.0.0.0:8000We provide a simple script to monitor the startup progress and notify you when the server is ready.
- AWS
- GCP
- Azure
For AWS, you can see the logs in the AWS CloudWatch UI within the log group
/aws/ec2/${STACK_NAME}-logsand log streaminstance-logs.Alternatively, you can use the provided bash script to monitor the logs until the server is ready:
bash notify.sh ${REGION} ${STACK_NAME} ${PUBLIC_IP}For GCP, first make sure that the Docker container is running on port
8000.You can view the logs in the Compute Engine VM instances UI. Within the UI, choose Observability, then choose Logs.
Alternatively, you can use the provided bash script to monitor the logs until the server is ready:
bash notify.sh ${PROJECT_ID} ${INSTANCE_NAME} ${ZONE} ${PUBLIC_IP}For Azure, you can monitor the Docker container status (running on port
8000) using one of the following methods:Option 1: Use the monitoring script
- Install the required dependencies for the monitoring script:
- Install sshpass on your local machine to enable automated SSH password authentication
- Set up and run the monitoring script:
bash notify.sh ${RESOURCE_GROUP_NAME} ${VM_PASSWORD} ${PUBLIC_IP}Option 2: Manual SSH access
- Connect to the VM:
ssh azureuser@$PUBLIC_IPNote: Use the password you set previously when creating the deployment.
- View the startup logs:
sudo cat /var/log/azure/custom-script/handler.log
sudo cat /var/lib/waagent/custom-script/download/0/stdout
sudo cat /var/lib/waagent/custom-script/download/0/stderr
sudo docker logs $(docker ps -q -f ancestor=modular/max-nvidia-full:latest)
Note: Use the container name
modular/max-amd:latestif you deployed MAX on an AMD instance.Both methods will help you confirm that the server is running correctly. The logs will show the startup progress and any potential issues that need to be addressed.
-
When the server is ready, use the public IP address that we obtained from the previous step to test the endpoint with the following
curlrequest:curl -N http://$PUBLIC_IP/v1/chat/completions \ -H "Content-Type: application/json" \ -d '{ "model": "modularai/Llama-3.1-8B-Instruct-GGUF", "stream": true, "messages": [ {"role": "system", "content": "You are a helpful assistant."}, {"role": "user", "content": "Who won the World Series in 2020?"} ] }' | grep -o '"content":"[^"]*"' | sed 's/"content":"//g' | sed 's/"//g' | tr -d '\n' | sed 's/\\n/\n/g'
5. Delete the cloud resources
Cleaning up resources to avoid unwanted costs is critical. Use the following commands to delete resources for each platform. This section provides steps to safely terminate all resources used in the tutorial.
- AWS
- GCP
- Azure
First, delete the stack:
aws cloudformation delete-stack --stack-name ${STACK_NAME}Wait for the stack to be deleted:
aws cloudformation wait stack-delete-complete \
--stack-name ${STACK_NAME} \
--region ${REGION}
gcloud deployment-manager deployments delete ${DEPLOYMENT_NAME} \
--project=${PROJECT_ID}az group delete --name ${RESOURCE_GROUP_NAME}Cost estimate
When deploying Llama 3 in a cloud environment, several cost factors come into play:
Primary cost components:
- Compute Resources: GPU instances (like AWS
g5.4xlarge, GCPg2-standard-8, or AzureStandard_NV36ads_A10_v5) form the bulk of the costs - Network Transfer: Costs associated with data ingress/egress, which is critical for high-traffic applications
- Storage: Expenses for boot volumes and any additional storage requirements
- Additional Services: Costs for logging, monitoring, and other supporting cloud services
For detailed cost estimates specific to your use case, we recommend using these official pricing calculators:
Next steps
Congratulations on successfully running MAX Pipelines locally and deploying Llama 3 to the cloud! 🎉
To stay up to date with new releases, sign up for our newsletter and join our community. And if you're interested in becoming a design partner to get early access and give us feedback, please contact us.
Did this tutorial work for you?
Thank you! We'll create more content like this.
Thank you for helping us improve!